
Most of the people love to travel and for them, it is must to build travel app that provide instant information about their traveling place. Those developers, who are thinking to create travel application for their users, can see guide in this post.
This guide is divided into two parts. The first part leverages the user preference that stored in a user profile and the second incorporates the first one with external services in a web application.
Table of contents:
Things You Require to Build A Same Application Create the cloud application Install and use cf command-line tool Prepare the development environment Bind a cloud service (MongoDB) Deploy a Spring application Integrate services Push the application to the cloudThings You Require to Build A Same Application
- A basic knowledge of the Spring MVC framework
- MongoDB NoSQL database
- An Expedia Developer API account to test app
- jquery-ui-map, the Google Maps V3 plugin for jQuery that helps to simplify the work with the Google Maps API
- Spring Tool Suite (or Eclipse IDE), with inbuilt the Cloud Foundry plugin


Note:
If you are clicking on Run the App, you can able to login with any ID and password. After that, you have to fork the code by clicking the EDIT CODE button in the upper right-hand corner after you click Get the code. If you are not already logged in then enter your DevOps Services credentials for that and have to click on the FORK button on the menu for building a new project. On other side, you have to export the code by choosing the root folder and select File >> Export from the left navigation.
Hire on-demand dedicated developers of desired skill & experience.
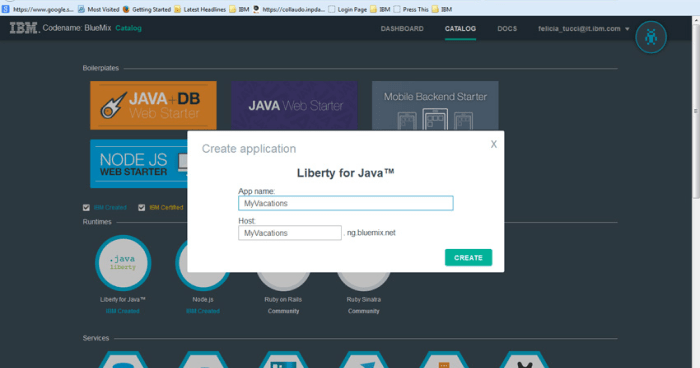
Create the cloud application
Here, we are going to start creating the cloud application by deploying the sample on Bluemix. One can choose Java with the Spring Framework for the best result. In addition, one can have to go to Bluemix and select type of application for developing an application. The type of application can be Java Web, Ruby, Java stand-alone, and so on. We are choosing Here, Java Web.
Install and use cf command-line tool
It’s time to manage the application with the Bluemix web interface or the command-line interface that offered by the Cloud Foundry project.
If you are choosing command-line interface cf then it allows deploying, associating service, controlling (start and stop) applications, and more.
Now, download the CLI from GitHub and launch the installer. cf.exe is an executable file that you can see after installation. Firstly, you have to set the target API endpoint and after that sign-in in that.
After that, you can see the list of applications, services, and bound services.
Prepare the development environment
The MVC Spring Framework is used this sample while the Spring Tool Suite uses the environment with the Cloud Foundry plugin. Here, they are using tools and technologies like
- Spring Tool Suite 3.4.0+ Cloud Foundry Integration for Eclipse 1.5.1
- Spring 3.1.1
- JDK 7
One can have to deploy on a Cloud Foundry platform when developing a Java Web Project. Doing this will create the manifest.yml file that shows the application and its resource needs to the Cloud Foundry runtime.
Now, we are parting our application in two different parts.
- The UserService is the first that exposes the API for managing the user info. An internal cloud platform MongoDB, which is popular NoSQL database, is used to realize the persistence of data.
- The MyVacations is the second that allows the logged-in user for searching available hotels by using some parameters. The values of some of these search parameters are provided by the UserService. The list and info of hotels are provided by Expedia Services. The list of hotels is positioned by Google Maps API Web Services on a map.

With UserService, you can simple know how to store information about users in a central location by using the MongoDB service. There are two major UserService functions like
In the profiling function, the user name is received by the UserService and searches the user information like number of adults, number of children, location, etc. and returns them to the client.
In The logging function, the user name and password is received by the UserService and searches for the user in the database. UserService returns it, if it finds the users otherwise creates a new record.
Bind a cloud service (MongoDB)
Developers have to create an instance of the service to use a MongoDB service. For that, they have to connect to Bluemix and choose Add a Service in the dashboard view.

Now, you have to choose MongoDB from the list of available services and create the service instance.
 If you don’t want to do this then you can use the command line:
cf create-service mongodb 100 mongodb_ser1
(USAGE:    cf create-service SERVICE PLAN SERVICE_INSTANCE)
cf bind-service UserService mongodb_ser1
(USAGE:    cf bind-service APP SERVICE_INSTANCE)
Your MongoDB service instance is ready and bound to UserService.
Use MongoDB service in the application
Once, you have developed the service and have associating it to your application then you have to add its configuration to VCAP_SERVICES as a read-only environment variable that has information which you can use in code for connecting to your service. If you have:
{
  "mongodb-2.2": [
      {
         "name": "mongodb-ser1",
         "label": "mongodb-2.2",
         "plan": "100",
         "credentials": {
            "hostname": "10.0.116.106",
            "host": "10.0.116.106",
            "port": 10192,
            "username": "46c538a6-e6e1-4d02-8132-77b0a4b2dc1c",
            "password": "0ceea0ea-5548-46ad-9b09-1002683aeca7",
            "name": "946dc87b-b455-4d12-b977-1b1ee22f1ade",
            "db": "db",
            "url": "mongodb://46c538a6-e6e1-4d02-8132-77b0a4b2dc1c:
0ceea0ea-5548-46ad-9b09-1002683aeca7@10.0.116.106:10192/db"
         }
      }
   ]
}
Using the VCAP_SERVICES variable, you can simple connect to the MongoDB service instance by extracting “url” JsonNode. All the parameters are contained in the URL that helps to connect the database like host name, port, user credentials, and DB name.
String env = System.getenv("VCAP_SERVICES");
	ObjectMapper mapper = new ObjectMapper();
	try {
		JsonNode node = mapper.readTree(env);
		Iterator<JsonNode> dbNode = node.get("mongodb-2.2").getElements();
		JsonNode cred =  (JsonNode)dbNode.next().get("credentials");
		String uri =cred.get("url").getTextValue();
		logger.debug ("url db: " + uri);
		return uri;
	} catch (JsonGenerationException e) {
		logger.debug(e.getMessage());
	} catch (JsonMappingException e) {
		logger.debug (e.getMessage());
	} catch (IOException e) {
		logger.debug (e.getMessage());
	}
	return null;
}
To create a DB connection, one can create a Spring configuration class by using the MongoDB Java driver, to return the DB object to the client.
@Configuration
public class MongoConfiguration {
	public @Bean DB mongoDb() throws Exception {
		MongoClientURI mcUri = new MongoClientURI(getUrlConnection());
		MongoClient mc = new MongoClient(mcUri);
		mc.getDB(mcUri.getDatabase());
		return mc.getDB(mcUri.getDatabase());
	}
The MongoConfiguration is used by the UserManager class for interacting with DB. Moreover, the “users” collection is received by the init method or can develop if it doesn’t available.
private void init(){
		ApplicationContext ctx =
	    new AnnotationConfigApplicationContext(MongoConfiguration.class);
		db = (DB) ctx.getBean("mongoDb");
		coll = db.getCollection("users");
	}
If we are considering MongoDB as oriented to the document rather than a relational DBMS, it means we have collections instead of having tables, rows (or tuples) than documents and columns than fields. Moreover, such fields are not predefined like the columns in a table. One can easily enter any kind of data in a collection. But, you must create a BasicDBObject to search a document.
BasicDBObject user = new BasicDBObject("username", userData.getUsername());
return (DBObject)coll.findOne(user);
UserController is the UserManager client that is using its functions for getting and saving the logged-in user information.
@RequestMapping(value="/user", method = RequestMethod.GET)
	public  @ResponseBody String getUser(@RequestParam("username") String username,
@RequestParam("password") String password)  {
		logger.debug("BEGIN: controller getUser - username:" + username);
		UserManager userManager = new UserManager();
		BasicDBObject user = (BasicDBObject) userManager.getUser(username, password);
		logger.debug("END: controller getUser - user:" + user);
		return user.toString();
	}
Deploy a Spring application
UserService is used by MyVacations for getting user information to profile the search with the values that the UserService has saved when user last login. The best thing is user can see place resulting from the search.
In the xml config, the controllers are not configured but it detected by the Spring Framework because of directive that included in the servlet configuration file.
<context:component-scan base-package="com.myvacations.app" />
HomeController, which is the first controller used to show the login page.
/**
	 * Simply selects the home view to render login page.
	 */
	@RequestMapping(value = "/", method = RequestMethod.GET)
	public String home(Locale locale, Model model) {
		return "login";
	}
Upon submission of the login page, the HotelsController is activated and this controller can be also called through an HTTP through the request with the “username” parameter and can also access UserService to get any user preferences that saved while the last access by this user.
The RestTemplate, a helper Spring class for client-side HTTP access, is used by this controller for making a RESTful call to UserService. In addition, the objects are passed to and returned with getForObject() method and are converted to HTTP requests and from HTTP by HttpMessageConverters. With this example, you can know that the class is used for calling the RESTful services, like UserService.
@RequestMapping(value = "/hotels", method = RequestMethod.GET)
public String getHotels(@ModelAttribute("username") String username,Model model) {
	logger.debug("BEGIN HotelsController: username=" + username);
	RestTemplate restTemplate = applicationContext.getBean("restTemplate",
	RestTemplate.class);
	user = (UserData) restTemplate.getForObject(new
	URI("http://userservice.mybluemix.net/userpref?username="+username),
	UserData.class);
Integrate services
If you want to integrate services to bring more data to MyVacations then here are two examples.
- The Google map service for viewing the hotels on a map.
- The Expedia RESTful service for showing hotels’ information.
In order to integrate, you have to go to Expedia API Developer for registration in developer’s account and an API key. The Submit button click activates the SearchController is an Ajax call in Hotels.jsp.
$.get('/search',
      $("#ricerca").serialize(),
      function (data, status) {
        if (status == 'success') {
            if (data.toString()==""){
                $("#map_canvas").hide();
We are finding call to the ExpediaClient in SearchController for getting the HotelSummary List.
List<HotelSummary> response=null;
	response = (new ExpediaClient()).getHotels(
			location, dateFrom, dateTo, numAdults, numChildren);
Using the user information that gathered by UserService, the ExpediaClient extracts the ExpediaObjects by decoding the Expedia JSON response.
Listing 1. Extracting a list of hotels
ExpediaObjects hotels= (ExpediaObjects)
restTemplate.getForObject(buildQueryHotelsURL(location,dal,al,numAdulti,numBambini),
ExpediaObjects.class);
A Google map image on your web page is embed by the Google Maps API. One can have to require a specific API key before you start a particular API key from Google. Now the key is free and you have to create a Google account
You have to choose jQuery-ui-map for interacting with the Google maps API. In addition, you have to launch gmap after developing a div or another same HTML container that enable to raise the Google Maps API’s function.
var map =  $('#map_canvas').gmap({
     'center': new google.maps.LatLng(data[0].latitude,data[0].longitude),
     'minZoom': 5,
     'zoom': 8
         });
Now, moving forward, one can have to create a map that focused on the first hotel’s geographic coordinates. Just have to create a marker for every hotel and place it on the map.
$.each(data, function (i, m) {
$(‘#map_canvas’).gmap(‘addMarker’, {
‘position’: new google.maps.LatLng(m.latitude,
m.longitude),
‘bounds’: true
}) .click(function () {…
To load an info window, you have to register a function on-click event with the short hotel description.
$('#map_canvas').gmap('openInfoWindow', {
                                        'content': descr
                                    },
Push the application to the cloud
We are now ready to deploy applications on Bluemix. For that, you have to use the Cloud Foundry CLI cf push command for initiating the deployment.
cf push MyVacations –path MYDIRMyVacations.war
Test the application
Developers have to run a simple run test for testing purpose and to see whether application is portable or not. The access to any user name and password is allowed by the login page. After login, you have to go to ‘Search Page’ and add the search parameters and click Search.
In case, the user is not yet present then it is created.
It is advisable to deploy Pivotal platform and Google App Engine in order to test the portability of the application on different cloud platforms.
Different tools and technologies are used to deploy on GoogleAE such as:
- Spring 3.1.1
- Eclipse 4.2+ Google plugin for Eclipse
- Google App Engine Java SDK 1.8.8
In next step, you have to add Google plugin for Eclipse that adds products to the Run menu for starting the server. The MyVacations installed on Google App Engine in this scenario that calls the UserService application that installed on Bluemix via its RESTful API.
Hire dedicated team for your next web development project.
Various tools and technologies are used to deploy on Pivotal includes:
- Spring Tool Suite 3.4.0+ Cloud Foundry Integration for Eclipse 1.5.1
- JDK 7
- Spring 3.1.1
With the Cloud Foundry plugin for Eclipse, you can easily deploy on the Pivotal platform and thus, test the application on the target environment directly without leaving the IDE. Just you require a valid Pivotal user account.
Application can be deployed by developers on this platform without any change and even, can be deployed the UserService application with minor changes.


